This article provides details on a focusing method that I developed specifically for springtails. Macrophotographic shooting at high magnification ratios indeed raises technical difficulties, whether in terms of focusing the subject (map), the very shallow depth of field and the very short distances (minimum and maximum) reduced between the subject and the end of the optical assembly (lens + ring flash).
For these reasons, it is essential to integrate a few parameters before rushing to the shutter, although the photographer's reactivity is just as decisive in ultra-macro, as it is in classic wildlife photography, when uses a telephoto lens on equally moving targets.
Here I discuss my experience of macrophotographic shots of subjects photographed without a stand, in situ, and of millimeter size or smaller.
Introduction :
We call macro photography an image whose magnification or magnification (both terms are used) is at least equal to 1:1. In other words, the projection of the image of the subject retains its original size on the camera sensor. It is beyond this relationship that some photographers use the term ultra-macrophotography. The amateur who devotes himself to macro photography and generally has a “normal” macro lens, first encounters the minimum focusing distance. For example, with my Sigma 105 mm 1:2.8 lens, the minimum focusing distance is 31.2 cm, which is way too far for the millimeter subjects I'm talking about. 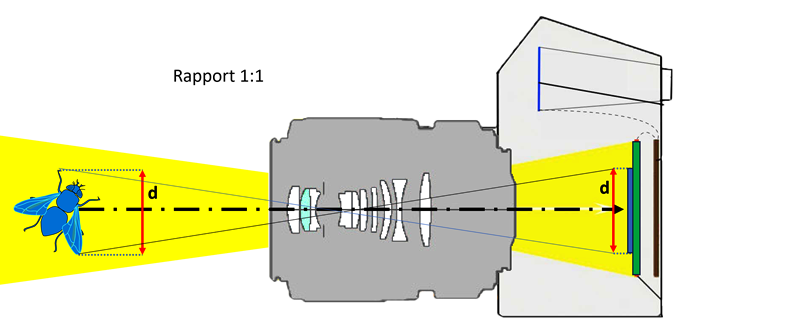
 With a 24 x 36 mm sensor (full frame) and a 1:1 optical ratio, on a subject measuring a few centimeters, the photographer may have to step back in order to fit his subject onto the sensor. On the other hand, with the same ratio and for subjects of millimeter size or smaller, the surface of the sensor will not be correctly exploited:
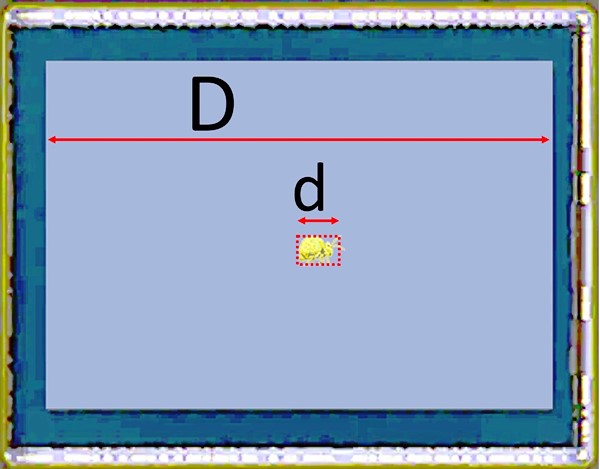
The diagram opposite reproduces the projection, at the 1:1 magnification ratio, of a springtail on an enlarged "full frame" sensor, but whose proportions are preserved (in reality D = 36mm and d = 2.5mm). The springtail inscribed in the small dotted rectangle only represents 7.2% of the useful surface area of the sensor. If the latter has for example 20 million pixels (this is the case with the Canon EOS7D Mark II that I use), only 1.44 Mpx will be used. The 92.8% not exploited can be partly assimilated to a loss. However, a portion could be dedicated to creating “bokeh”. In addition, this loss will require cropping of the subject (red dotted lines below) which will be accompanied by a significant degradation of the image definition.
The example of the springtail mentioned is, however, far from being representative of the subjects that we may have to photograph within the arthropod phylum. A good part of them have sizes frequently smaller than the example above, by a factor of 5 to 10, which reduces the usable part of the sensor and increases the degradation of quality in the same proportions
Shooting in such conditions, while still possible, therefore becomes almost unusable to obtain an acceptable result.
In practice :
The amateur who devotes himself to macro photography and generally has a “normal” macro lens, first encounters the minimum focusing distance. For example, with my Sigma 105 mm 1:2.8 lens, the minimum focusing distance is 31.2 cm, which is way too far for the millimeter subjects I'm talking about.
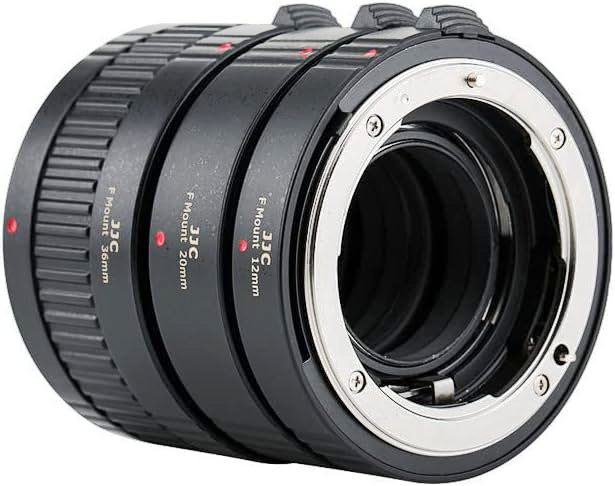 To shorten this minimum distance, we can use extension rings, which are tubes without lenses that are inserted between the lens and the body. These rings do not cause any degradation in quality, as no element is inserted in the optical line. Another advantage is their low cost and ease of implementation. They also make it possible to maintain the functionalities and/or automation of the lens such as autofocus or the various stabilization modes. For example, the addition of three extension rings for a length of 68mm makes it possible to significantly reduce the minimum distance of the aforementioned 105mm macro to a few centimeters. However, this reduction in minimum distance is accompanied by a reduction in depth of field and a loss of brightness.
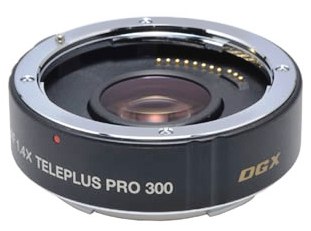 Another solution is to insert a focal length extender between the camera body and the lens. I was able to test an x1.4 equipped with 5 coated lenses which transforms a 105mm lens into a 147mm. However, despite the quality of its optical assemblies designed to limit geometric defects, the lenses of such a multiplier can alter the images in terms of vignetting, chromatic aberrations or sharpness.
 A third solution consists of placing one or more eyecups in front of the lens, which are lenses equivalent to magnifying glasses. So a windshield (+3 diopters) will transform a 105mm lens into a 178mm. Inexpensive lenses significantly degrade the geometric and chromatic characteristics of the image. Only the more expensive achromatic lenses offer an assembly of two lenses (or doublet) which allows chromatic defects to be partially limited.
OIn addition to these adaptations which make it possible to approach millimeter sizes, many photographers use cameras with APSC sensors of smaller size (22.2 x 14.8 mm) than the full frame (24 x 36 mm) for their macro photography. This sensor surface deviation allows for a resulting magnification ratio of x 1.6.
A few manufacturers have developed lenses dedicated to ultra-macro, but one lens dominates this niche, the Canon MP65. Below left in 1:1 ratio and deployed in 5:1 ratio.
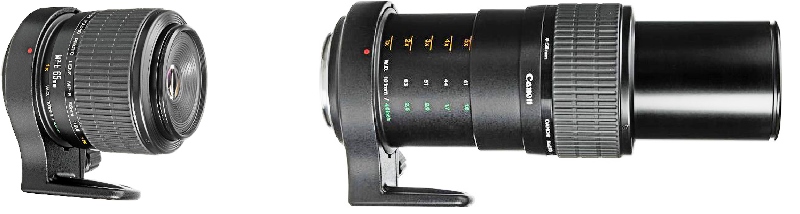
“The other side of the coin”, when we consult user reviews, we see that many photographers are confused by its use, partly for the following reasons:
• Very reduced distance to the subject (100 mm at 1x ratio and 40 mm at 5x).
• Depth of field from 0.134 mm (at F8 and 5x) to 1.12 mm (at F8 1x) depending on the ratio used)
• No autofocus or focus ring.
• No optical stabilization.
• Dimensions in high magnification position.
 We must also take into account the lack of light in such small areas which requires the use of a flash and/or an auxiliary lamp.
The use of a ring flash (fixed at the head of the lens) also reduces the minimum shooting distance (U) by a value equal to its thickness.
For example, the ring flash that I use (Canon 14 EXII) which is 25 mm thick, reduces the minimum optical-subject distances of the MP65 to 75 mm at the 1:1 ratio and only 15 mm at the 5:1 ratio.
A combination of difficulties :
These problems could be overcome if other factors inherent to the very nature of the subjects to be photographed were not added to those already mentioned.
Except if we capture and kill the subject to immobilize it, which is not my practice with very rare exceptions (focus-stacking on a bench), “in situ” macro photography comes up against other pitfalls:
• Subjects located mainly on the ground requiring the photographer to be in an uncomfortable lying or crouching position.
• Almost impossible to use a photo stand due to the mobility of the subjects.
• Subjects equipped with sensory receptors, chemoreceptors, etc. which trigger their escape during approach (let's not forget that the minimum useful distance is of the order of a handful of cm) sometimes requiring apnea photography !
• Lucifuge subjects who try to escape, when the LED aiming lamps of the ring flash light up, or when the superficial layers of litter are cleared to reach the levels where they live.
• The weight and bulk of the equipment are also factors that should not be neglected when resting on the elbows, one must also maintain control of movements of a tiny amplitude made essential due to the fact that this objective does not have a ring focus.
Super-macrophotography of small arthropods therefore combines technical and physical challenges like few other photographic practices. As such, it is the most trying photographic practice I know. Fortunately, it offers access to dimensions little explored by the amateur and provides gratifying rewards.
Some data in figures :
Let's review the difficulties that the photographer must face. Firstly, the technical challenges illustrated by the tables below relating to the use of the Canon MP65. The loss of brightness is directly related to the magnification ratio.
Effective aperture F = Objective aperture x (magnification ratio +1)
Thus, the MP65 lens which has an aperture of 2.8 will have, with a magnification of 2, an effective aperture of: 2.8 x (2+1) = 8.4.

The table above is only valid for an aperture of 1:2.8. Below we can see the actual apertures for all the aperture values selected on the camera.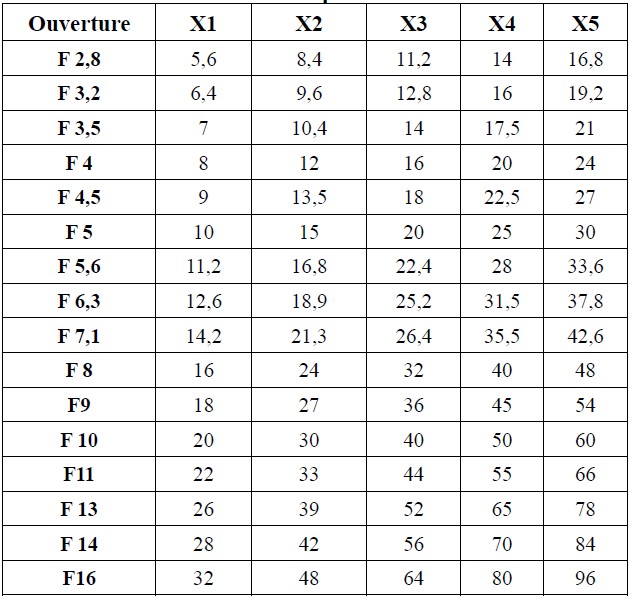
For example, if we set the single ring of the MP65 lens to a ratio of x 4 and the diaphragm at F11, the effective aperture will be 55. Which confirms the essential nature of an exterior light source.
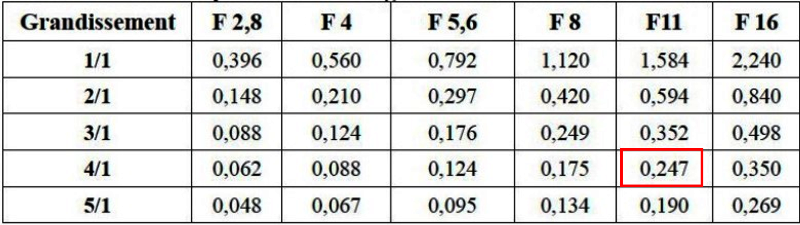
This depth of field table can be confusing. Thus, by maintaining the aforementioned settings (4:1 ratio and F11) the depth of field is only 0.247mm.
How do you focus with such a short range, without a camera mount or lens ring?
In principle, only a translation can achieve this. But with the front part of the optics placed on the palm of one hand placed on the ground and the case held by the other hand, rectilinear movements of a few tenths of a mm are very difficult to perform. Not to mention that the most imperceptible error in movement calls everything into question.
Let's not forget that our targets are often mobile and quick to jump or run away. At high magnifications, the slightest breath becomes a hurricane and the tiniest movement of the photographer an earthquake!!
Spécific solutions :
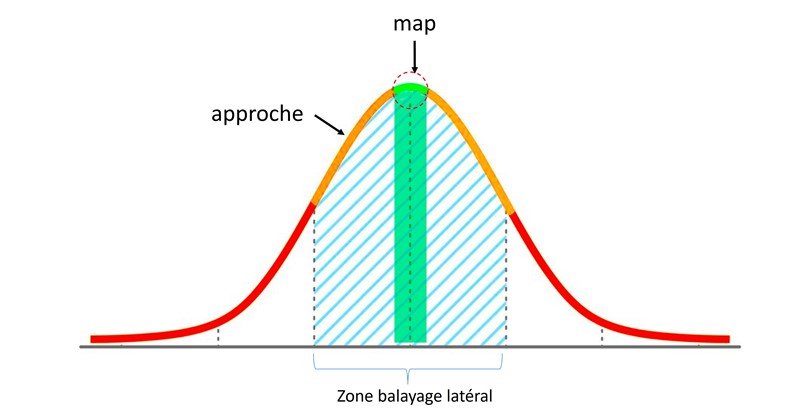
However, practice has allowed me to develop a technique that I call “intuitive triggering” and which is based on 3 phases:
• Focus adjustment in “front” position.
• Slight alternating lateral translations of the camera (yellow arrows in the diagram below) resulting in rotations around the “pivot axis” (under the annular flash supported by the palm of the left hand).
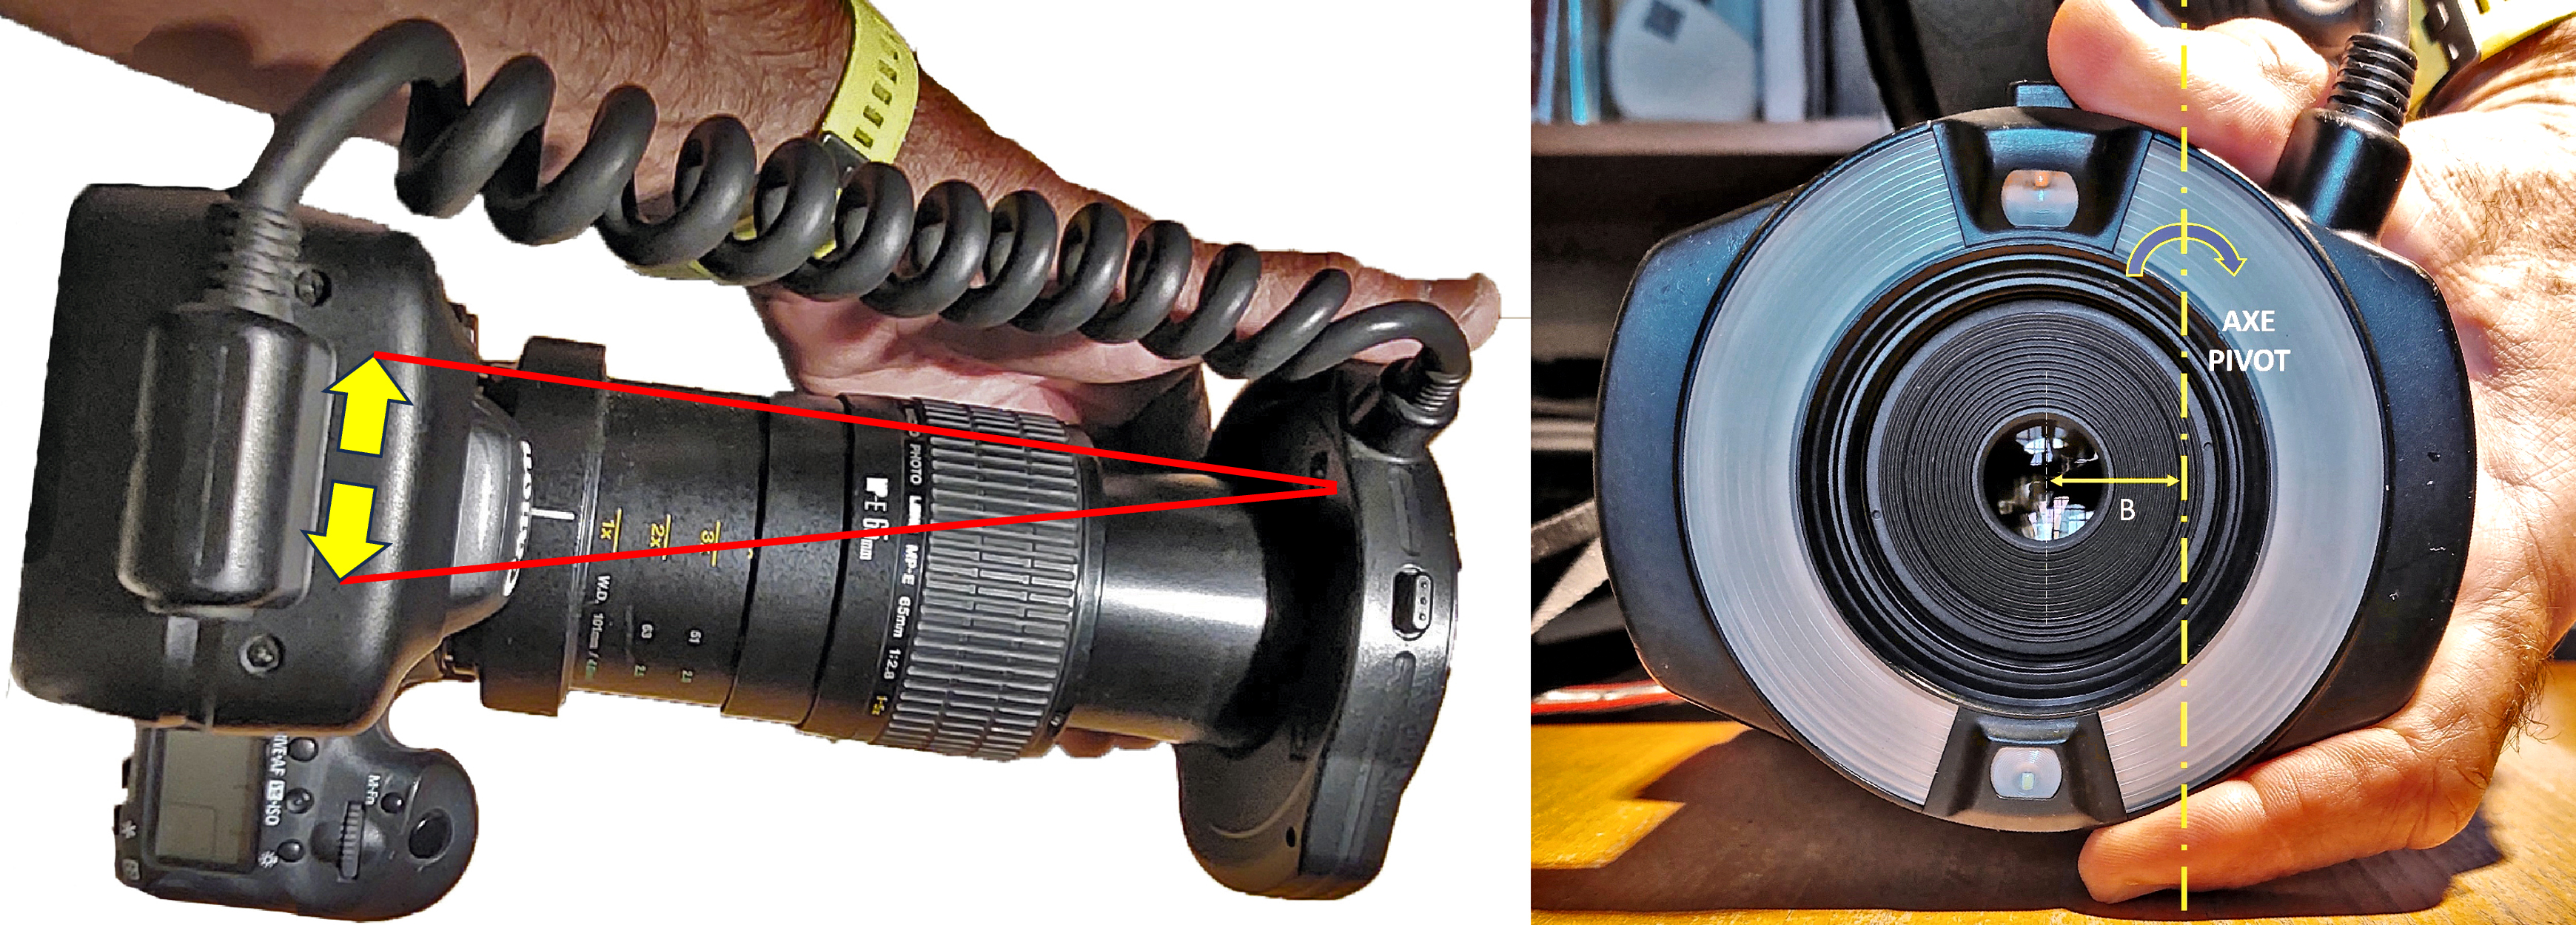
• Press the trigger at the end of the “approach” zone, when the aim arrives at the “map” zone located at the top of an imaginary Gaussian curve which precisely marks the ideal “map” point.
In practice, adjusting the map during alternating translations becomes intuitive, thanks to the use of the peripheral vision of the eye 25 to 30 times faster than central vision. Indeed, peripheral vision sends up to 100 images per second to our brain while central vision requires the eye to “fixate” on its subject for 200 to 400 milliseconds

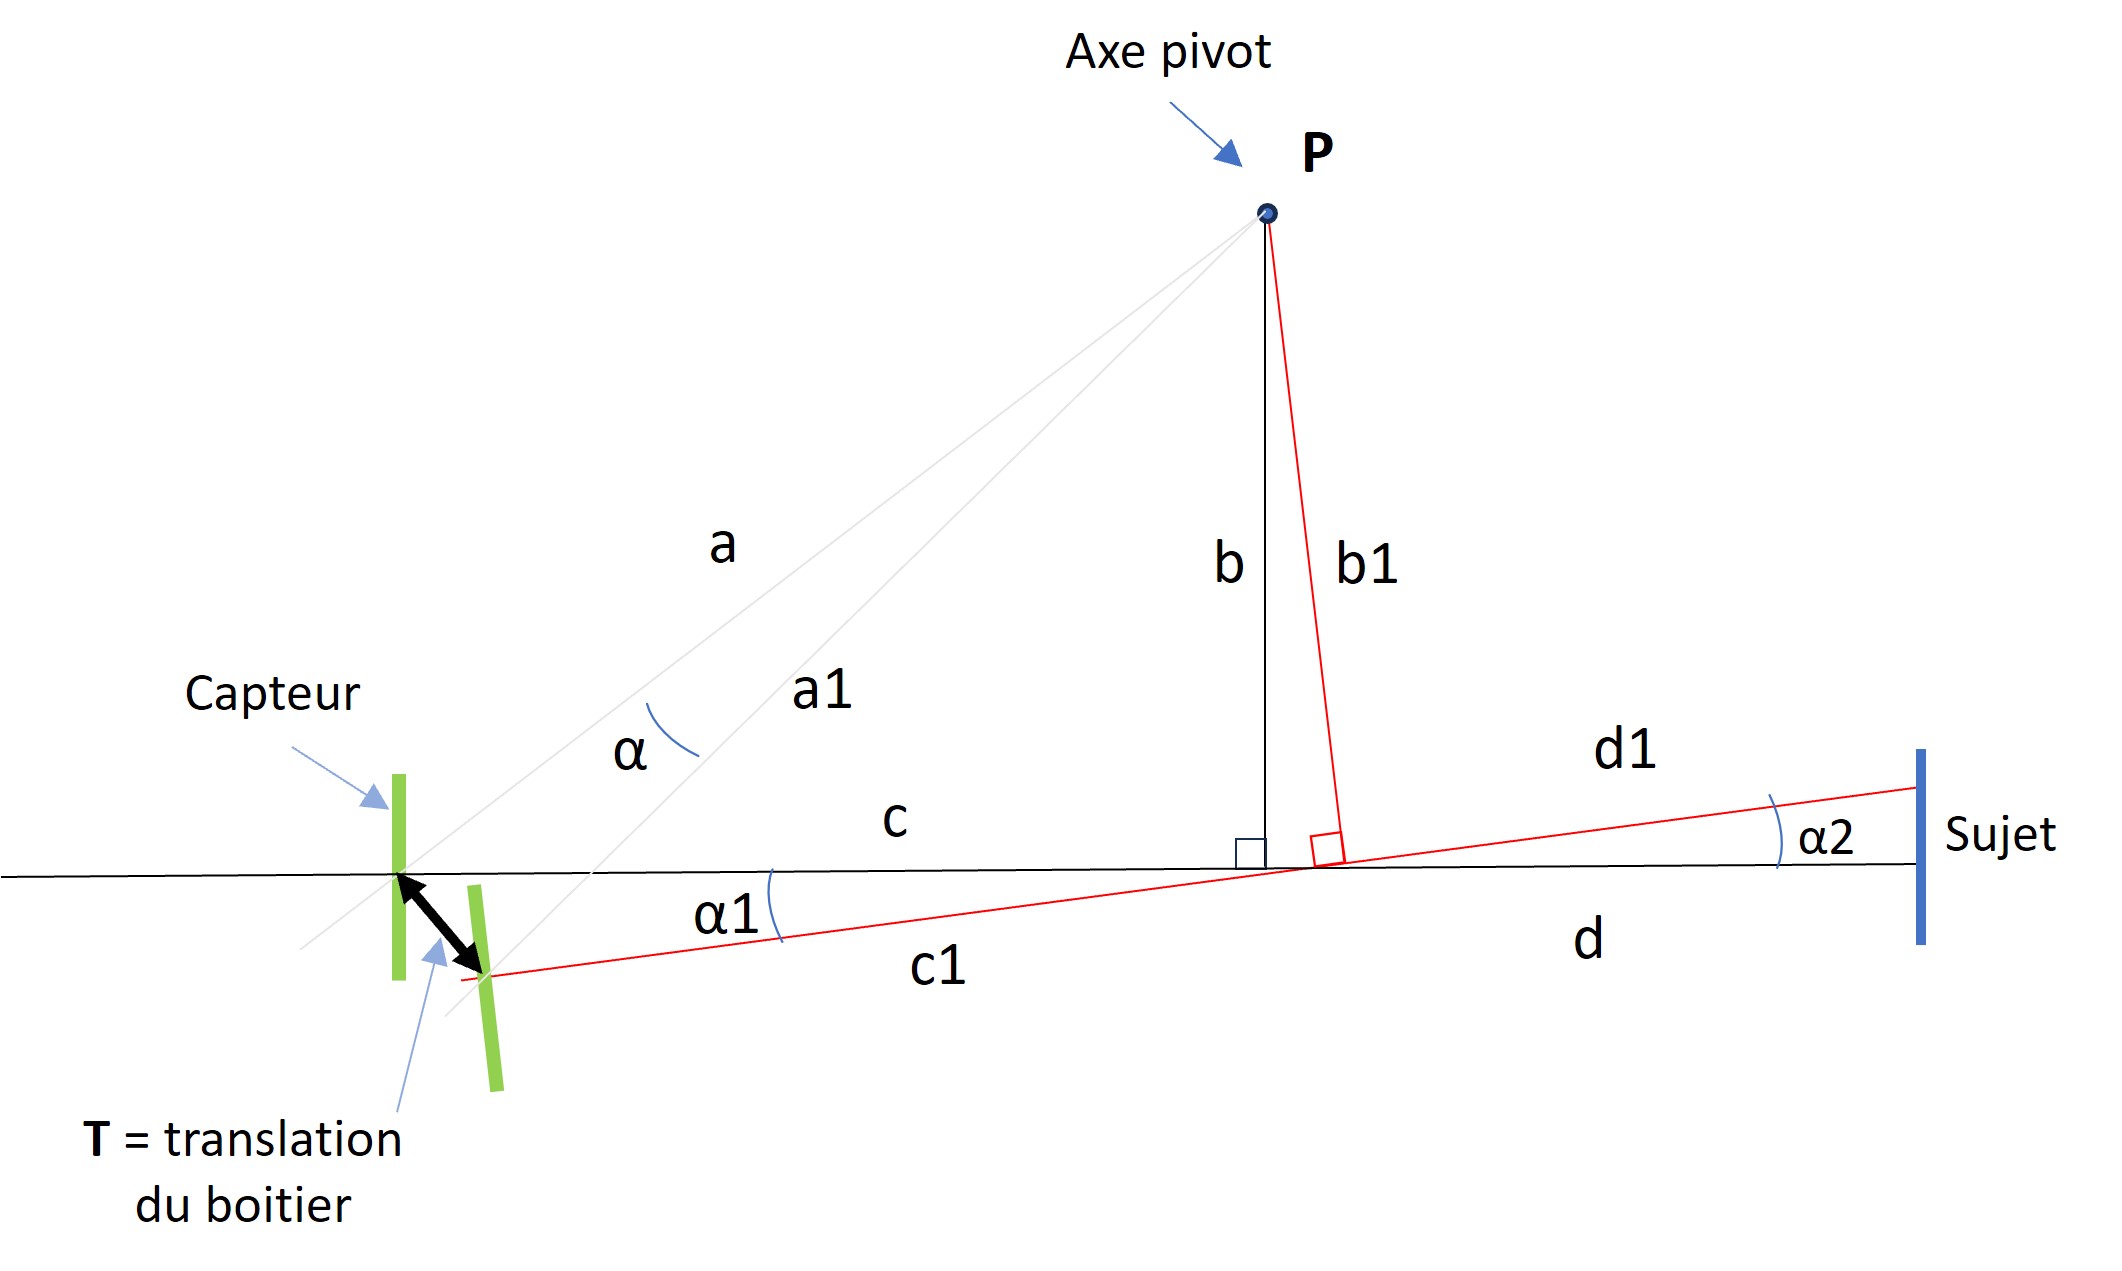
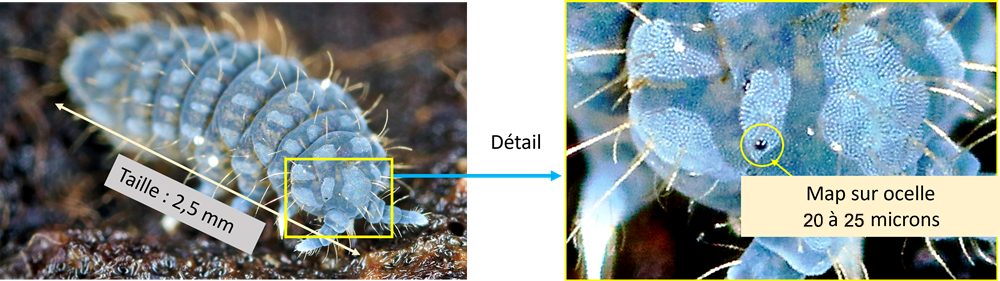
The sketch below* illustrates this focusing technique which makes it possible to obtain a tiny translation from a lateral movement of greater amplitude and therefore easier to achieve. This multiplication effect makes it possible to obtain precise maps. Once acquired, the mechanisms become reflexes and quick to execute.Example of focusing carried out without a base by this method on the eyespot of a deutonura whose diameter is between 10 and 15 microns.
Comments :
C = C1: Distance between the sensor and the front face of the front lens of the objective.
C being equal to C1, the triangle represented by C, C1 and the base T constituting the translation, is isosceles. The sine of the vertex angle is equal to T/C. Two angles opposite each other are equal, so α1 and α2 are equal. α2 is a right triangle whose sine of the vertex angle is equal to T/C. The cosine of this angle is therefore 1-(T/C)2. It follows that :
d1 = d / 1-(T/C)2
Example :
The characteristics of the MP65 lens give different map values depending on the magnification:
• Ratio 1:1 = 105 mm
• Ratio 2:1 = 73 mm
• Ratio 3:1 = 68 mm
• Ratio 4:1 = 60 cm
• Ratio 5:1 = 55 mm
If we apply the above formula with an aperture open at f/8, a magnification at x3, C ≈ 210 mm and d ≈ 68 mm and if we perform alternate translations (+10mm/-10mm) relative to the point map , i.e. T≈ 20 mm, we obtain a distance d1 of:
68/1-(20/210)² = 68.622
The amplitude of the translation movements of the body will have an impact on the variation in distance of the lens about (68.622-68.0) = 0.622 mm.
If we refer to the depth of field table (above) for these same shooting parameters, this variation of 0.622 mm represents 250% of the depth of field. We can deduce from this that it is not necessary to carry out translations of such a large amplitude.
I have developed the tables below considering T as a variable allowing you to approach 100% of the depth of field, depending on various magnification and aperture settings.
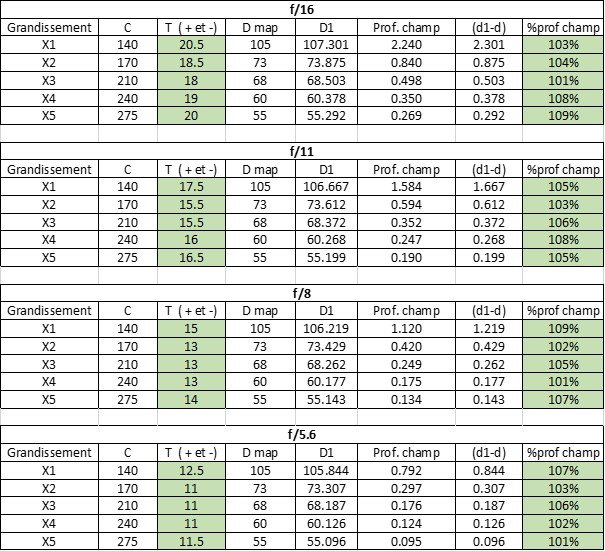
With reference to the gauss curve above, note that a T value of 16 mm on this table means an alternating translation of +8mm/-8mm of the case.
Below, example of focusing carried out without a base by pointing using this method on the eyespot of a deutonura whose diameter is between 20 and 25 microns.
As an indication, my common shooting parameters with the MP65:
The F11 aperture setting is a good compromise if you use a ring flash, it allows you to optimize the focal length without significantly altering the sharpness which deteriorates significantly beyond F14. Shutter speed 250 hundredths of a second (maximum sync with eos7D MKII). No focal length multiplier or extension ring.
*Sources: Thanks to Serge Rochain who verified my method by translating it into a principle diagram and a relationship allowing the translation of the case and the distance difference (d1-d) to be linked on the optical axis.
https://www.editions-complicites.fr/pages-auteurs/serge-rochain/